Welcome to DataPipeline plugin’s documentation!
Business Purpose
Designing data pipelines using Topology and Orchestration Specification for Cloud Applications (TOSCA) standard language enables the ability to easily compose data driven applications from independently deployable, schedulable and scalable pipeline tasks, such as microservices, serverless functions or self-contained applications.
The aim is to provide standards based methodology and tools for contolling the life-cycle of such composable data pipelines in a DevOps manner and to enable companies to move from monolithic data management applications to freely reusable, composable, and scalable data pipeline services.
Technical Details
RADON Datapipeline Methodology
Following figures shows the basic concept of data pipeline. RADON data pipeline provides an environment to build serverless data intensive applications and handle the movement of data between different clouds in an efficient manner. In the process of data movement, RADON Data pipeline allows the users to apply analyticcal operations onto the data taking the help of serverless platform. Such applications can be designed using TOSCA language. We see PipelineBlock as a basic building block of a TOSCA based data intensive appications.
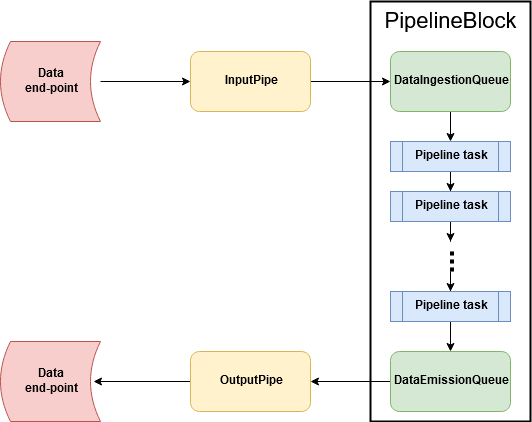
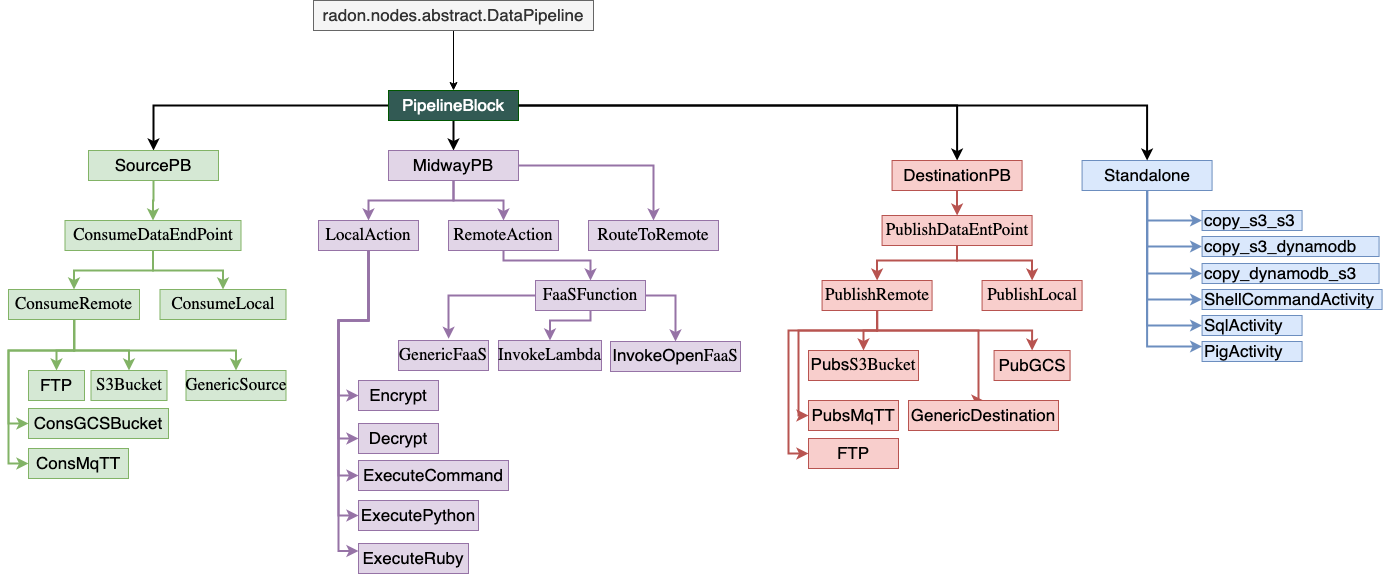
A PipelineBlock can be designed for different pipeline tasks, such as extracting data from a remote database, or from a AWS S3bucket, processing the data by invoking serverless function etc. In RADON data pipeline, the TOSCA data pipelines nodes structured in a manner presented in following figure.
The detail description on how to desing a data pipeline based TOSCA service template can be found User Guide section.
Where is data pipeline plugin in RADON-Architecture?
This consortium will design and develop a set of TOSCA based pipeline nodes that will be available in radon particles repository. The service template developed using those datapipeline nodes will then be forwarded to the data pipeline plugin which will make sure that the user-designed service template is workablle and the pipelines can be deployed in the required cloud or local environment.
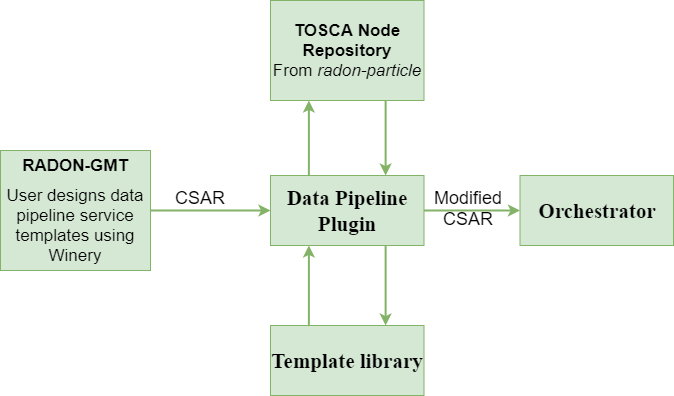
The above picture presents the interaction of data pipeline plugin with other RADON components. The pipeline plugin can be invoked through a command line interface or through REST-based interface.
Plugin’s responsibilty?
The pipeline plugin will be responsible for:
- Parsing and reversing the pipeine CSAR
- Attaching the necessary relationship templates in case of multi cloud pipeline deployment.
- Updating the node templates based on the targeted cloud environment.
- Ensuring the data encryption in multi-cloud service deployment
What is inside data pipeline plugin?
- This plugin unzip the CSAR file, get the .tosca file (the service blueprint).
- Parse the the .tosca file and understand the node topolology.
- Make any changes/modification to the .tosca file itself, if needed.
- Updates the templates, if needed.
- Zip again all and create the CSAR file.
- Pass the CSAR file to the RADON Orchestrator (optional).
This is the initial version of the Data pipeline plugin. In the proceeding version, the plugin will be improved and will come with lots of features.
The following video provides a 5-minute demo.
Getting Started
Generating Pipeline CSAR
The TOSCA based data pipeline service tempalte can be generated usng the RADON Graphical Modelling Tool (GMT), Winery. You can follow this step to setup RADON GMT.
- Open Winery and click on Service Templates manu.
- Create a new srvice tempalte by clicking on Add New button.
- Provide suitable name and click on Add button.
- Here you can see the list of service templates. Select newly created service template.
- Now select the Topology Template menu item followed by Open Editor button.
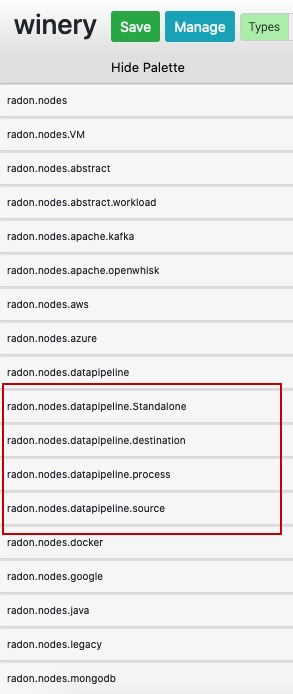
- In the Winery: topology modeler window, find the suitable data pipeline TOSCA nodes.
- Drag the required TOSCA nodes from the palette area (as shown in below figure) and set the properties and make the connection with other pipeline nodes. All the pipeline related nodes fall under the highighted categories in below figure.
- An example for such is given can be seen in following figure:
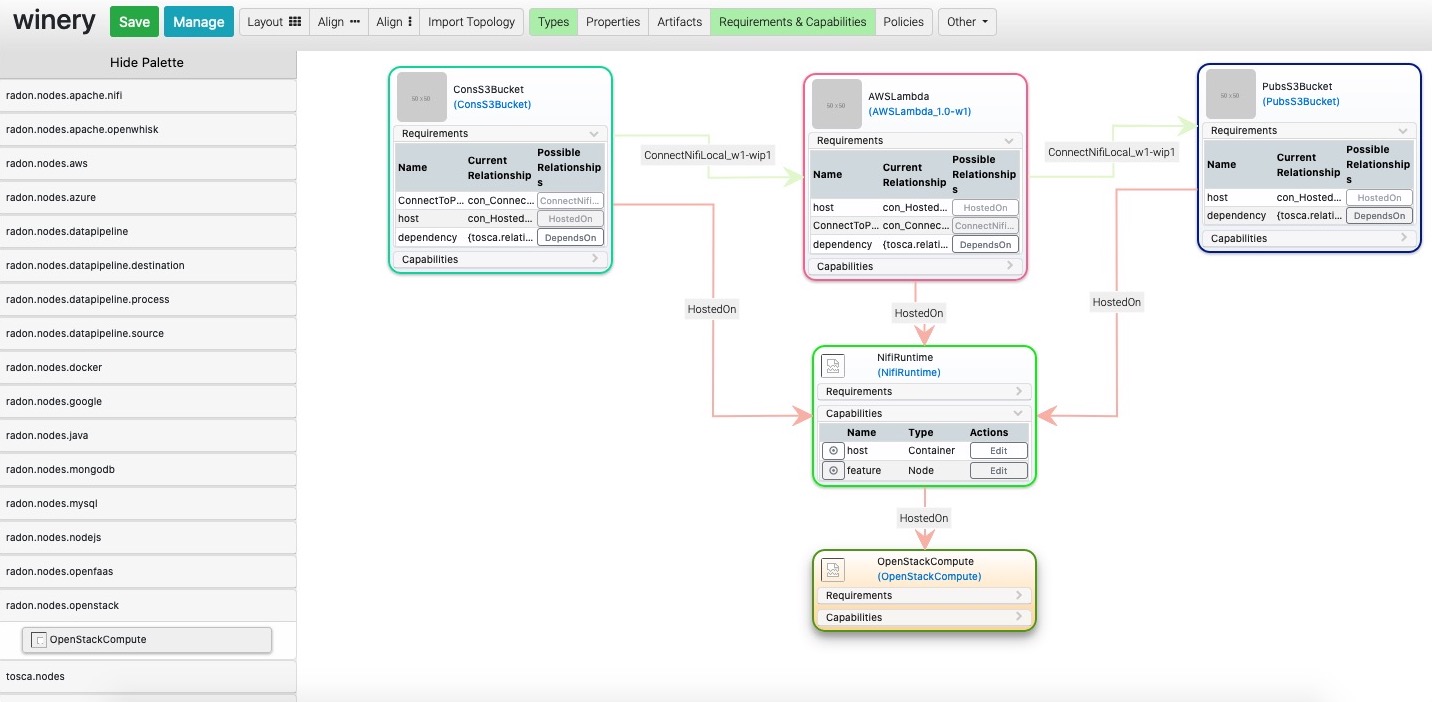
The figure contain three pipelines: ConsS3Bucket, AWSLmabda, and PubsS3Bucket. These three pipelines are hosted atop Nifi environment within OpenStack private cloud environment.
- Click on the Save button and close the Topology modeler window.
- Now in the Winery Repository window, export the CSAR file, by clicking on Export -> Download.
you may refer to Winery User Guide for further instruction on how to export the CSAR.
The exported CSAR now can be sent to data pipeline plugin.
Verifying and updating with data pipeline Plugin
The plugin can be used through command line interface or by invoking the REST API using Swagger UI.
How to use the plugin CLI?
- Download the plugin github repository using git or as a zip file.
- Make sure that Python3 environment is working on your machine.
- Keep your TOSCA service ready and note the path.
- Keep the CSAR file ready for input.
- Install the opera in virtual environment
$ mkdir ~/opera && cd ~/opera
$ python3 -m venv .venv && . .venv/bin/activate
(.venv) $ pip install opera
[click here](https://pypi.org/project/opera/0.5.8/) for detailed installation procedure of Opera. It is recommended to install opera v0.5.8.
- install ruamel.yaml
(.venv) $ pip install ruamel.yaml
- Change current directory to /src.
- Execute the following command with the CSAR file
(.venv) $ python3 DPP.py <.csar file>
How to use the plugin API?
The plugin also contains a REST-based interface, using which users can execute the plugin on-demand or include it as a part of a CI/CD process. DataPipeline plugin is publicly available under the Apache License 2.0 open-source license in GitHub: https://github.com/radon-h2020/radon-datapipeline-plugin
Steps: 1. Web service version of the plugin is available in the datapipeline-server folder
- Download the github project repository
git clone https://github.com/radon-h2020/radon-datapipeline-plugin
cd radon-datapipeline-plugin
- User Docker to build and deploy the data pipeline plugin webservice
cd  datapipeline-server

# building the image
docker build -t radon_dpp_server .

# starting up a container
docker run -p 8080:8080 adon_dpp_server
4. Direct your browser to here to access the RadonDataPipeline API ui with REST request example templates:
http://localhost:8080/RadonDataPipeline/ui/
User’s Guide
In this section, you will see how to design a service template using data pipeline nodes. With the current version of TOSCA based data pipeline node types, user can not create a connection with other non-data pipeline TOSCA nodes. The TOSCA data pipeline nodes can be found in RADON particle GitHub repository.
To illustrate the design process, let consider an use case of synchronising AWS S3 bucket and Google Cloud Storage (GCS) bucket.
Demo Video
Users can user RADON IDE, to design a service template in data pipeline apparoche. In this example, we will create a service template that syncronises Amazon S3 bucket and Google Cloud Storage (GCS) bucket.
The following video provides a 5-minute demo on how to design the service template using RADON IDE.
Steps:
- Login to RADON IDE (How to)
- Create and Go to your workspace (How to)
- Launch the Graphical modelling tool to create a service template (How to)
- Create the service template (How to)
- Go to the topology modeller by clicking on `Topology Template
- Form the Palette area, create following node types
- OpenStack node which is under radon.nodes.VM Nifi TOSCA node from radon.nodes.nifi ConsS3Bucket TOSCA node from radon.nodes.datapipeline.source PubGCS TOSCA node from radon.nodes.datapipeline.destination
- Host Nifi on OpenStack.
- Similarly, host ConsS3Bucket and PubGCS on Nifi
- Connect ConsS3Bucket to PubGCS.
- Save the service template and close the window.
- Now, in the Winery Repository window, export the service template to IDE and close the window.
How to use Data pipeline plugin from RADON IDE
The data pipeline plugin can be used to ensure the consistency in the data pipeline-based TOSCA service template. The plugin takes the CSAR as the input and returns the modified CSAR which can be used further with other RADON tools, such as orchestrator, VT, etc. The plugin checks mainly two types of potential user-made errors. Firstly, the errors related to the connection between two data pipeline nodes. Here, the plugin checks if two pipeline nodes are connected with the correct relationship type. This also checks if multiple connections exist between any pair of pipeline nodes. Secondly, the plugin also updates the CSAR with correct configuration if it found any improper encryption configuration.
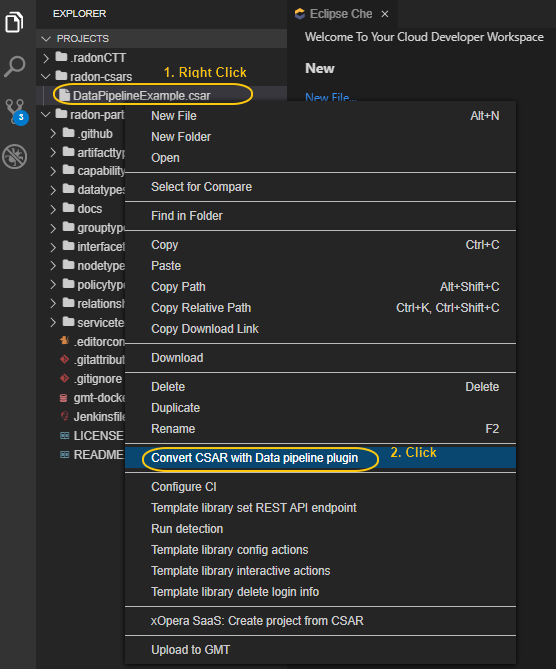
Figure IDE_DPP.1: Option to invoke data pipeline plugin
To invoke the data pipeline plugin with exported CSAR (in this case DataPipelineExample.csar), right click on the csar and select “Convert CSAR with Data pipeline plugin” option, as shown in Figure IDE_DPP.1. The converted csar will be exported to the same folder structure, in this case the output is DataPipelineExample_converted.csar, as shown in Figure IDE_DPP.2.
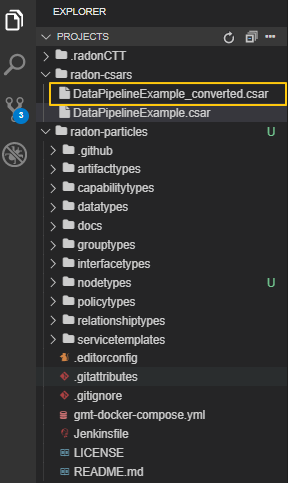
Figure IDE_DPP.2. Data pipeline plugin output
Additional Information
Development and Downloads
- Source code repository: https://github.com/radon-h2020/radon-datapipeline-plugin
- Demo:
Contact
- Chinmaya Dehury and Pelle Jakovits, Institute of Computer Science, University of Tartu, Estonia
Acknowledgments
This work is being supported by the European Union’s Horizon 2020 research and innovation programme (grant no. 825040, RADON).